New, refaced, or painted, that is the question? Not quite the $264,000 question, but we could see it from here. When facing a kitchen remodel, cabinets can be a significant investment. Apart from appliances, (which is an entirely different discussion) cabinets are likely the most expensive part of a kitchen remodel. It was a decision I spent a lot of time pondering, planning, replanning, calculating and a few sleepless nights of a racing mind.
Our situation was this: the cabinets were custom-built in the 1950s, were very sturdily built, but lacked storage space, counter top and had very plain-flat-faced doors. They were built from birch and were stained a light oak color. We had one 10 foot run of cabinets with a small 6 inch jog at one end where the stove was located. In the middle of the run was the sink leaving very little working counter space.
Over the 15 years we had lived in the house, I had pondered how to dress up the cabinets. I painted the existing knobs, got a great deal on new knobs on eBay, had tried to figure out a way to add moulding to them to dress them up, but never found anything I really felt was worth the money or effort.
In the dreaming/planning stage, I visited with every home improvement cabinet department, some custom cabinet companies, refacing companies, etc., and reviewed all of the options. It was quite overwhelming, so many options! Here is a brief summary of what I found:
New cabinets: this of course if the most appealing option, everyone loves new. But, it comes with a price. After pricing out new cabinets for my space, dream cabinets, we were looking at about $30,000 + counter top and organizing supplies. There are many justifications for going all new and I know a lot of people who have gone that route, but I am pretty frugal and was choking on the $$ just a bit. And then there is the "do it right, or not at all" argument. Well, we had gone the "not at all" route, and there really wasn't much longer we could continue on that path. Was it time to just bite the bullet and do it right?
For couples who are looking at resale, I understand that the kitchen can be the make-or-break in a sale and the investment is warranted. Our house was built by my great-grandparents, my children are the 6th generation of my family to live in the house. At this point, I really can't see selling it outside of the family and looking to cash-in on a resale just isn't in my mindset. That said, our house needs to serve us, my husband and I, as we will likely be here long term.
Reface Cabinets: I researched this a bit, and the changes can be pretty impressive, and the cost can be as much as half of new cabinets. There are a number of options available, cabinets styles, finishes, etc. They place a veneer over your the cabinets and replace the doors. The doors being the most expensive part of that process and I had 20 doors and 8 drawers. Not a single one a standard size. Still a significant investment, but the same old cabinets. Or we could attempt to build our own doors, after all we are pretty handy. We would need to invest in some new tools, but it was doable.
Paint/Stain the existing cabinets: This was the least expensive of the options, the most labor intensive on our part. I have seen both the good and the bad versions of this option. This of course didn't solve the flat-faced cabinet doors. With a number of colors, techniques, theories it is also one of the most flexible/changeable over time.
Decisions, decisions...
One of the beautiful aspects of our house is the dark woodwork and lots of it, and I had envisioned that we could go with dark cabinets to tie things together. In the refinishing of the floor, there was a very dark colored stain which caused us to need to go with a dark floor stain. The thought of dark cabinets in a room with one small window and a dark floor, seemed a little depressing. I had determined that light cabinets were in order. Painting was looking better all the time.
Through a series of conversations, what we decided was a priority at this point in our lives were our girls. Hope, a freshman this coming fall, and Megan an 8th grader we were looking at 4-5 years until they were likely starting to head off on their own. Focusing time and money on family right now seemed like the logical choice, deciding to revisit our kitchen needs after the kids were gone and we had a feel for what we were going to need when it was just the two of us.
And then, I came across this video, which made me think about the potential of our doors:?
I have always loved the look of glass cabinet doors, but my cabinet organizational skills are always not conducive to having transparent doors. Luckily, glass is easily frosted and having done some stained glass work in the past, I knew there were some beautiful options available. Although, when looking at new cabinets, the doors we had liked best and felt fit the vintage of the house, had bead board in the center. The wheels started to turn, maybe there is something to this? We could do this, what did we have to lose?
The Plan
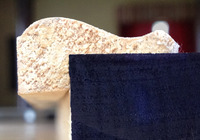
 Profile of the trim moulding
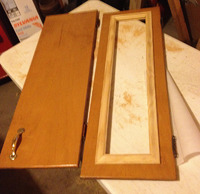
Finding the right trim and cutting out the center of the door. I think this just might work. If nothing else, we are committed now, no turning back.
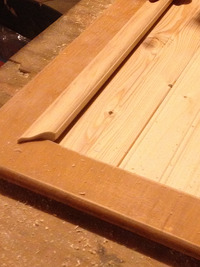
We took a door and decided to give it a shot. I picked up some trim that I thought would work at Lowes making sure the profile would be right to cover our cuts as the video showed, and some quarter round to finished the back side. Here is the moulding we went with: Stain Grade Pine Ply Cap Moulding which was under $5 for an 8 foot length. Remember this is going on the inside of the cut you make in the door.
?
 Corner miterYou will want to miter the corners at a 45? angle like a picture frame, this might take a little trial and error to get just right, so pick up a couple of extra lengths.
 Before & with Trim
To secure it all together we opted for another purchase, the Micro Pin nailer. Now there are brad nailers which uses really tiny nails, but the Micro pin is even smaller. Probably a hair smaller than a stick pin, it holds well and the holes are far less visible. We picked ours up at Menards, this is the one we chose: Micro Pin Nailer. We shot in from the top as well as in from the side to make sure it wasn't going anywhere.
Next, we played with glass vs. bead board material for the panel and the quarter round on the back side. I wasn't completely happy with how that quarter round trim looked on the inside and opted to just use the same moulding on the inside as we had on the outside since it really wasn't that much more expensive and made for a nicer finish inside.
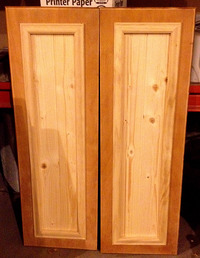
 AfterAs far as the glass vs. bead board debate, we decided to use the bead board on the upper and base cabinets, but glass on the row of "bonus" cabinets which are smaller cabinets above the upper cabinets.
Pleased with the result we decided to move forward cutting and trimming the remaining doors.
Up next....Prime & Paint!
cloudy with a chance of meatballs the hobbit movie hanukkah gpa calculator menorah chanukah chanukah
No comments:
Post a Comment
Note: Only a member of this blog may post a comment.